 Author: John F. Fletcher, Technical Support Manager
Related Product(s)>>
>>Download Full PDF
ABSTRACT
Testing cured coatings for flaws and defects is often a crucial part of the acceptance process for a coating assessed against its specification. This is particularly the case for pipeline and storage tank coatings and for coatings applied for corrosion protection, where discontinuities in the coating can lead to premature failure.
Task groups within both ASTM and CEN (ISO) have been doing work on existing and new methods for low-voltage, wet-sponge testing and high-voltage “holiday” detection.
Two ASTM test methods are being updated and a new test method is being developed within CEN for joint voting with ISO to also establish test sampling plans and acceptance/rejection criteria. The NACE recommended practice, RP0188 is also being considered for revision in 2007.
This paper describes the new thinking in the area of porosity testing with particular reference to the selection of the correct test voltage for high voltage testing and the recent developments in the relevant test equipment.
INTRODUCTION
Flaws and defects in coatings will lead to premature failure of the coating in service and result in corrosion damage due to the effects of the surrounding environment, particularly if the coating is immersed or partially immersed. Pipelines and storage tanks, for example, must have pinhole free coatings to either protect the contents from the substrate to prevent contamination or to protect the substrate from the contents to prevent chemical damage.
Discontinuities, flaws and defects in coatings can take many forms and they are sometimes referred to as ‘holidays’, but they all have one common property in that they reduce the effective strength of the coating and hence its durability. One measure of the strength of an organic coating is the insulating property of the coating, its ability to resist the flow of current when a voltage is applied.
Detection of weaknesses in the coating when it is applied to a metal substrate can be determined by the use of the low-voltage sponge test or the high-voltage spark test for non-conductive coatings applied to electrically conductive substrates such as steel. Defects will be located when current flows between a probe and the conductive substrate, which is connected to the voltage source by a signal return cable.
This paper discusses some of the issues raised by discontinuity testing of coatings with particular reference to changes in the standard test methods that are currently in hand.
COATING DEFECTS
There are many causes of coating defects and some of the more frequently encountered flaws, which result in discontinuities include, pinholes, runs and sags, cratering, cissing and incorrect coating thickness. Runs and sags are caused by excessive coating thickness, while pinholes are caused by either air or blast media entrapment. Cissing is characterized by surface breaks in the film revealing the substrate and often results from substrates being contaminated by grease or oil. Cissing is also known as crawling or fisheyes. Cratering is the result of air released from the surface of the coating at the point where the coating is partially cured and the coating does not flow back to cover the void created by the air release.
Incorrect coating thickness can be detrimental, be it too thick or too thin. Figure 1 shows some examples of these coating defects and there are many others of a similar nature. Figure 2 illustrates how the coating thickness may be determined to check it against the specification.
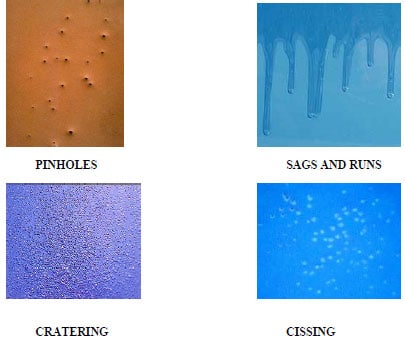
Figure 1 – Examples of coating defects
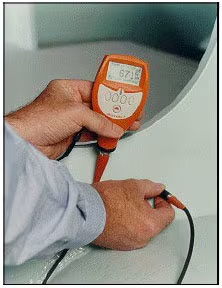
Figure 2 – Measurement of coating thickness
STANDARDS FOR DISCONTINUITY (HOLIDAY) DETECTION
Standards and test methods have existed for some time in the American Society for Testing and
Materials, ASTM, and the National Association of Corrosion Engineers, NACE, organisations but
until now there have been no equivalent standards within the International Standards Organisation,
ISO.
ASTM
There are several documents covering discontinuity (holiday) detection published by ASTM, but subcommittee D01.48 has now withdrawn the Test Method for Holiday Detection in Pipeline Coatings, G 62.
It should be noted that under ASTM rules, test methods require round robin testing and practices do not. A round robin test for holiday detection in pipeline coatings will be very difficult to arrange and complete. For this reason, it is likely that this test method has been withdrawn in favor of a practice.
Subcommittee 01.46, Industrial Protective Coatings, has recently taken over stewardship of D5162, Practice for Discontinuity (Holiday) Testing of Nonconductive Protective Coating on Metallic Substrates and this practice is undergoing a five-year review in 2007.
Both of these documents describe the high and low voltage methods for detecting holidays and provide methods for determining the appropriate test voltage for the high voltage test based on the thickness of the coating.
The method for determining the test voltage given in G 62 provides two alternatives. Either multiply the dielectric breakdown of the coating in kV/mm by the allowable thickness of the coating.
| e.g. | To determine the test voltage for a coating with a dielectric strength of 6 kV/mm and a thickness of 500 µm (0.5 mm) |
| | Multiply 6 kV by 0.5 mm to produce a test voltage of 3 kV. |
| | Or use of one of two equations based on the square root of the coating thickness and a
constant, which is dependant on the units and the thickness above or below 1 mm (40 mil) as
follows: |
| | V = M √Tc |
| | Where: | V = test voltage |
| | | Tc = coating thickness |
| | | M = Constant determined by thickness above or below 1 mm (40 mil) and by the units of thickness metric (mm) or imperial (mil). |
The following table, Figure 3, provides the values of M in the formula for metric and imperial units.
| Fig. 3 | Values for the constant M in the formula |
|---|
| Thickness | Units | M |
| Tc<1 | mm | 3294 |
| Tc>1 | mm | 7843 |
| Tc<40 | mil | 525 |
| Tc>40 | mil | 1250 |
The ASTM practise, D 5162 provides a table of suggested test voltages for bands of coating thickness from 200 – 310 µm (8 – 12 mil) up to 5,100 – 6,350 µm (201 – 250 mil). Figure 4 is a reproduction of this table as it is given in the document, which was last approved in 2001.
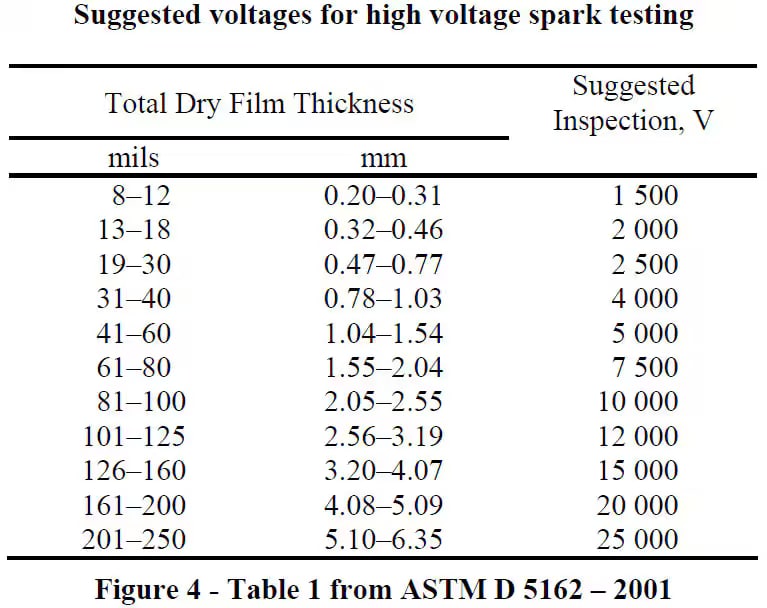
Figure 4 - Table 1 from ASTM D 5162 – 2001
It should be noted that there is also a standard practice, D 4787, entitled “Continuity verification for
liquid or sheet linings applied to concrete substrates”, which covers testing for discontinuities in
coatings on concrete using both the low-voltage wet sponge and the high-voltage spark test
methods. This practice is also being revised in 2007 by subcommittee 01.46 under the five-year
rule.
ISO
The European Standards body CEN has accepted a new work item to create a test method for testing porosity (discontinuities) in corrosion protection coatings on metal substrates. This standard, when it is complete will be subject to parallel voting both by CEN members, European Countries, and the International Standards Organisation (ISO) members, worldwide.
This standard is being prepared by Working Group 2 of technical subcommittee CEN/TC 139/SC 1 and will take the same form as the test methods recently prepared for coating thickness and adhesion testing. This means that the test method will describe the principles for the high and low voltage tests including the test voltage selection for the high voltage test. It will describe how to set up inspection areas and sampling plans and will provide acceptance/rejection criteria based on the results of the testing.
The initial draft of this standard has been prepared and has been reviewed at a working group meeting in mid September 2007. The working group has “expert” representative from at least five member countries and these “experts” represent equipment manufacturers, paint manufacturers, inspection practitioners, process specifiers and test laboratories.
It is intended that this standard will cover the use of both low-voltage wet sponge testing and high voltage spark testing and that the selection of the high voltage test value will be based on the nominal thickness of the coating and will be set above the value for the breakdown of air at this nominal thickness.
Low-voltage wet sponge testing will be recommended for coatings on metals with a thickness of less than 500 μm (20 mil) and high voltage testing will be recommended for coatings thicker than 500 μm (20 mil).
| Fig. 5 | Suggested Voltages for High Voltage Spark Testing |
|---|
| Total Dry Film Thickness | Total Dry Film Thickness | Test Voltage |
| (μm) | (mil) | (kV) |
| 200 to 280 | 8 to 11 | 1.5 |
| 300 to 380 | 12 to 15 | 2 |
| 400 to 500 | 16 to 20 | 2.5 |
| 530 to 1,000 | 21 to 40 | 3 |
| 1,010 to 1,390 | 41 to 55 | 4 |
| 1,420 to 2,000 | 56 to 80 | 6 |
| 2,060 to 3,180 | 81 to 125 | 10 |
| 3,200 to 4,700 | 126 to 185 | 15 |
SELECTING A TEST VOLTAGE
Study of the high voltage methods described in the two ASTM standards mentioned above, G 62 and D 5162, shows limitations for each of the test voltage selection methods.
Using the typical breakdown voltage of air under normal conditions of pressure and humidity, 4 kV/mm, as the minimum test voltage and 6 kV/mm as the dielectric strength of a typical paint system, the optimum test voltage for a coating 1 mm thick is 5 kV, i.e. half way between the minimum voltage and the maximum voltage the coating will stand. If the voltage drops below the minimum voltage there will not be sufficient potential to create a spark through a defect to the substrate and the flaw will not be detected. If the voltage is above the maximum the coating can be damaged by the excessive stress.
An important aspect in high voltage spark testing is the issue of under testing vs. over testing. Most contractors will want to minimize the test voltage to protect the coating, stating that, if there is not a flaw evident before testing, the act of testing should not produce a flaw by burning the coating with excessive voltage. However, the pipeline owner, through the coating inspector, will probably want to ensure that the coating fully meets the specification and will want low strength areas to be detected even if the coating is intact prior to the test. This will mean maximising the test voltage to ensure that when low coating thickness is encountered burn-through results.
The application of the test voltage formulas given in G 62 produces test voltages that do not meet the requirement over the full range of thickness. Using the constant for thicknesses below 1 mm the test voltage is too high below 300 μm, acceptable in the range 300 – 700 μm but too low in the range 700 to 1,000 μm. Using the constant for thickness above 1 mm the test voltages follow the same pattern, i.e. too high from 1.01 to 1.6 mm, acceptable from 1.7 to 3.5 mm but too low above 4.0 mm.
The application of the test voltages given in table 1 of D 5162 produces values that are, in general, acceptable for the lower end of the thickness bands but are too low for the upper end of the same thickness band.
For example, for the thickness band 0.47 to 0.77 mm, the recommended test voltage is 2.5 kV. The minimum test voltage for 0.47 mm, based on 4kV/mm is 1.9 kV and the maximum test voltage is 2.8 kV, but for 0.77 mm the minimum test voltage is 3.1 kV and therefore the test voltage of 2.5 kV
is too low.
The use of a chart, see figure 6, makes the selection of the correct test voltage easier and reduces the risk of either missing flaws because there is insufficient voltage or damage to the coating because there is too high a voltage.
The chart uses logarithmic scales of thickness against test voltage, with the minimum test voltage charted along with a selection of dielectric strength values. To determine the minimum test voltages simply find the thickness on the x-axis and find the test voltage at the point where the thickness value intersects the ‘AIR’ line.
The maximum voltage value can be determined with reference to the dielectric strength of the coating material. This information is normally available form the coating manufacturer.
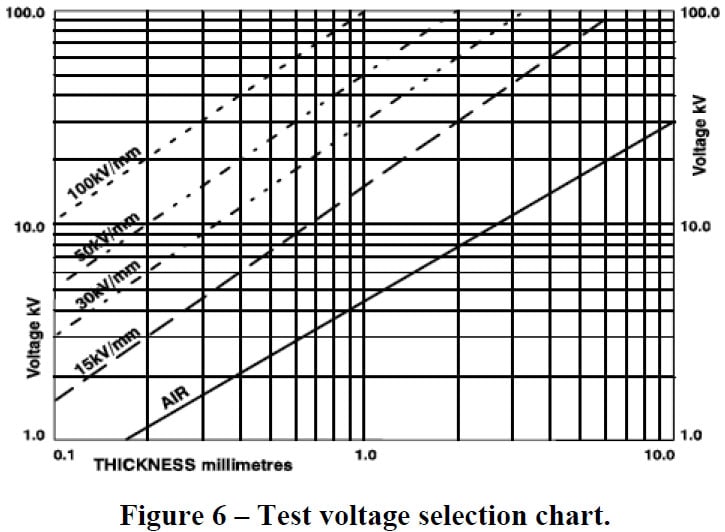
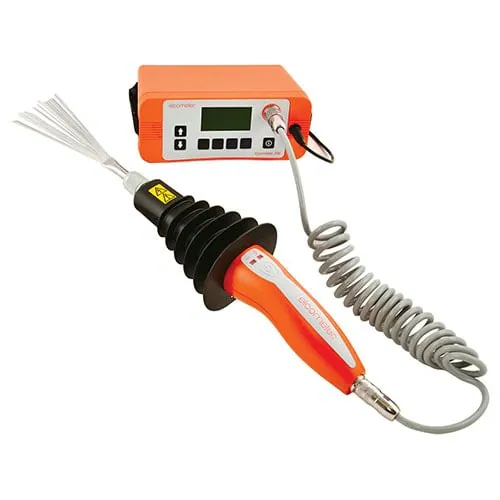
Figure 7 – A High voltage spark tester
HIGH VOLTAGE TESTING EQUIPMENT
High voltage spark testers have to be designed with both safety and ease of use to the fore. Many pipeline coatings will be tested using a voltage somewhere between 2.5 and 15 kV. Sometimes the test voltage will be 25 kV or higher. Thus the high voltage power supply must have limited current output so the user is safe from accidental contact with the high voltage probe.
Although the current can be limited so that is does not cause damage to a normal healthy individual, the involuntary action arising from contact with such a high voltage even at a low current level means that the high voltage probe must be treated with care particularly on site.
The latest design is illustrated in figures 7, 8, 9 and 10, and shows the high voltage handle and the rugged case, which is waterproof to the IP65 as defined in the BS EN 60529 standard. The case houses a rechargeable battery so the unit is fully portable. The high voltage is however generated in the handle, which has a safety hand grip that ensures the high voltage is only present when the handle is gripped correctly. Three interchangeable high voltage handles are available, 0.5 – 5 kV, 0.5 to 15 kV and 0.5 to 30 kV.
This design uses a microprocessor control circuit so the operation of the tester is menu driven. This enables an automatic voltage calculator based on the standards detailed in this paper. Simply enter the coating thickness and the correct test voltage is calculated and set. The unit has a closed loop voltage check to ensure that the output voltage is correct.
When using direct current (DC) high voltage spark testing the high voltage is applied to the coated surface using a probe with the current detector connected to the metal substrate with a signal return cable. As this cable is operating at a low voltage its length is not critical as long as there is no electrical resistance to prevent correct current detection. The high voltage cable is however critical and for this reason the new design has the high voltage generated in the probe handle to keep the possibility of voltage drop to a minimum.
The principle of the test is that as the high voltage probe passes across the surface the absence of current flow through any spark indicates that the coating is free of critical defects. However, the instant a spark is generated and the current flows and is detected the test is over and a defect has been located.
For additional safety the high voltage power supply is designed so that the high voltage collapses as soon as a significant current is drawn. It may be the case that a defect is detected at the limit of the test voltage and as soon as the voltage drops the defect appears to have gone. When the correct test voltage is re-established by the power supply this defect will be detected again.
A range of probe accessories is available to use with the high voltage handle to enable large surfaces to be tested quickly, to allow easy access to surfaces, e.g. extension rods and for internal and external pipe coatings.
LOW VOLTAGE PINHOLE TESTING
When testing of thin coatings and detection of pinholes that penetrate through to the substrate is required then low voltage, wet sponge pinhole detectors can be used. This method is also covered by the standards mentioned earlier but the principle is the detection of holes through the coating using moisture from the sponge as a conductive medium for current generated by the detector to flow down the hole in the coating and through the metal substrate to the signal return cable. It must be noted that this method will only detect holes that penetrate through the coating to the substrate. Other flaws such as scratches, inclusions or voids in the coating may not be detected unless there is a path for the moisture to the surface.
The test voltages are in the range 9 to 90V with a particular test voltage of 67.5 V, which traces its origin back to specialized 22.5 V batteries used in the early days of photography for igniting flash powder. Although these batteries are no longer manufactured the test voltage has survived in test methods.
The detection sensitivity depends on the voltage setting and for 9 V the detector sounds an audible alarm when the sponge probe passes over a pinhole that has an electrical resistance below 90,000 ohms (± 5%). At 67.5 V the threshold is 125,000 ohms and at 90 V the threshold is 400,000 ohms.
The 9 V test method is suitable for detecting holes in coatings up to 300 μm thick and the 90 V test method is suitable for coatings up to 500 μm. Tap water is used to provide the conductive path as it contains minerals which allow the current to flow. A surfactant can be added to ensure that the moisture penetrates the smallest holes. Figure 11 shows a low voltage wet sponge tester with its signal return cable.
The name wet sponge is a misnomer in practice as the sponge should be squeezed to remove all the excess water, so it would be more correct to call this a moist sponge test.
As with the High Voltage Spark Tester, the Low Voltage Wet Sponge Holiday Detector is connected to the metal substrate using a signal return cable.
CONCLUSIONS
The main method for checking pipeline coatings for defects that potentially reduce the service life of the coating is the High Voltage Spark Test. There are other test methods specifically for pinholes but the Low Voltage Wet Sponge Test is limited to coatings at or below 500 μm (20 mil).
New work is in hand to both revise the existing ASTM standards and to create a new ISO standard for detecting porosity in coatings on metal substrates using the high voltage and low voltage wet sponge test methods. The revision of the ASTM methods will center on the method for selecting the correct test voltage so that a high confidence in the detection of flaws can be achieved with out the risk of damage to the coating.
To this end a revised table of recommended test voltage values has been submitted for consideration by the Task Group where the coating thickness bands have been reduced to ensure that the recommended voltage does not exceed the maximum voltage for the lower end of the band when the dielectric strength of the coating is of the order of 6kV/mm. Figure 12 shows the proposed table, which has more bands than the table currently used for ASTM D 5162.
Portable High Voltage Spark Testers are designed to allow safe and simple field-testing of coatings up to a thickness of 7 mm, which requires a test voltage of at least 28 kV. Probe accessories to allow testing on shapes and large areas are now available and make testing of complex structures easier.
Related Product(s)
Download Full PDF |