 Students evaluate a gauge for measuring uncured powder coating thickness
Authors: Joachim Domnick, Denise App, Stefan Staudt, Kevin Widmann
Related Product(s)>>
>>Download Full PDF
Visit European Coatings Journal Website>>
Powder coating technology is studied during the Chemical Engineering/Colour and Paint course at the University of Applied Sciences, Esslingen. An ultrasonic gauge is used to check application thickness before curing. The accuracy of this instrument was evaluated, and readings were found to correlate well with the final cured film thickness.
Results at a glance
- The importance of powder coating technology means that it represents a central experiment in the laboratory of application technologies during the
study course Chemical Engineering/Colour and Paint at the University of Applied Sciences, Esslingen.
- To assist in application experiments carried out by students who may be very inexperienced, the Innotest “SaveCoat 7” ultrasonic coating thickness gauge is used as a standard method of checking the thickness of uncured powder layers.
- The accuracy which can be obtained with this instrument was analysed in the course of a set of statistically designed experiments and in more general use by the students.
- A good correlation was obtained with the thickness of the cured coatings determined by standard MID gauge. Observations are made on how the accuracy of these measurements can be optimised.
Every year about 50 engineers graduate from the bachelor course in Chemical Engineering/Colour and Paint at the University of Applied Sciences, Esslingen, Germany. The paint engineers from Esslingen are employed successfully in many relevant industrial sectors ranging from paint raw materials suppliers to users applying the final paint.

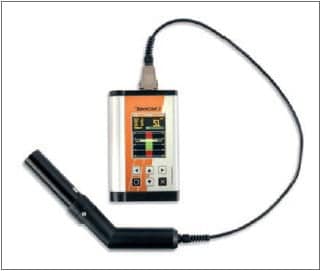
Figure 1: “SaveCoat 7” measuring device (Innotest AG)
During this course the students deal for about half a term with topics in application technology and systems engineering. Here, laboratory application technology represents a core topic. Students have to apply and optimise many practice-oriented application technologies from cataphoretic e-coat to flocking. Of course powder coating technology cannot be omitted.
Experiments are based on the application of paint layers to approved standards using various powder spray gun geometries (deflector and flat jet) and charging mechanisms (corona and tribo). More complex workpieces such as
u-shaped profiles are used in addition to simple test panels. Taking into consideration the limited time for the experiments,
it is extremely important, especially with students who have little experience in powder coating technology, to achieve successful results as fast as possible. Therefore, airborne ultrasonic technology has been used for many years to measure uncured powder coating thickness. It is then possible to adjust incorrect coating thicknesses almost immediately after application or recoat the whole component after blowing off the powder. The “SaveCoat 7” powder thickness gauge from
Innotest AG has been used for this task for two years.
Operating principles and use of the thickness gauge
The measuring principle of the contactless operation thickness gauge is based on the evaluation of the echo of an ultrasonic field directed towards the coating layer. Using a basic calibration provided by the manufacturer, the device computes the powder coating thickness which can be expected after curing.
The reading is therefore directly comparable with the measurement results of a conventional magnetic-inductive (MID) measurement gauge, for example. Prior to measurement a zero-adjustment procedure using a reference block has to be conducted. This should at least be done once a day.
It should be taken into account that the measuring range of the device is only from 30 to 110 micrometres, a fact which has to be considered especially by users with poor practical experience. In this respect, the detection of low or excess coating thicknesses, which is integrated into the device’s software, is very helpful.
As shown in Figure 1, the unit is a handheld measuring gauge, which can be used immediately after powder application directly on the workpiece. Because of its measurement principle, perpendicular orientation of the probe to the substrate and the correct measurement distance (ca. 1.5 cm) are essential to capture good ultrasonic echoes. When signal detection begins, the device starts an automatic optimisation routine in which poorer signals are continuously replaced by better signals. Through distance and energy measurements the user is permanently aided by acoustic and optical hints to optimise orientation and distance of the probe.

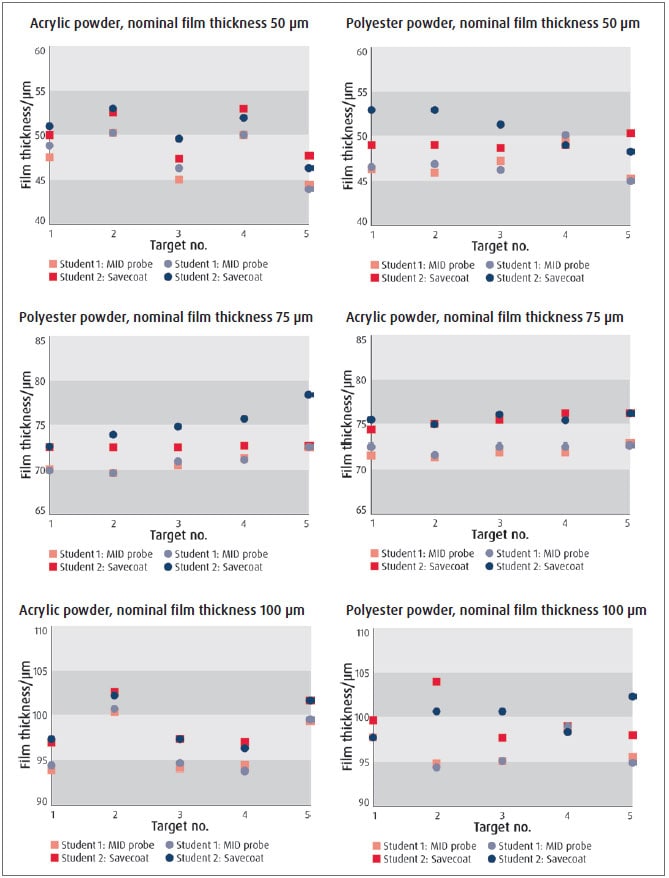
Figure 2: Comparison of measured average coating thicknesses
Depending on experience, it may take some measurements until the user is familiar with handling the device.
A measurement, consisting of approximately 20-30 echoes, lasts – with a measuring frequency of 15 measurements per second – about 2-3 seconds. The measuring point has a diameter of about 1 mm [1].
Statistical analysis of accuracy and reproducibility
In a student course project, the absolute measurement accuracy and reproducibility of the ultrasonic gauge were verified. For a detailed evaluation the method of analysis of variance (ANOVA, basic information see e.g. in [2]) was used.
Using a white acrylate powder for exterior application and a red polyester system for interior areas, two series of five test panels with average coating thicknesses of 50, 75 and 100 μm were coated. All measurements were carried out on a defined spot near the panel centre.
The determination of the reference coating thickness on each spot was obtained with five measurements with a standard magnetic-inductive probe (MID). For the ultrasonic measurements, a tripod was used to avoid uncertainties due to improper positioning and orientation of the probe. Five measurements from two students were made on each measuring spot independently from each other. Figure 2 shows the comparative results of the average measurement achieved by the two students. To facilitate readability only one of the two measuring points has been selected.
Clearly, the instrument is able to reproduce very well the effective coating thicknesses after curing, independently of the powder coating used and the absolute coating thickness. In this respect it can be qualified as a production integrated measuring method.
Accuracy levels and their improvement
However, it is also evident that for both types of powder the ultrasonic device indicates a layer thickness 3-4 μm thicker than the magnetic-inductive probe does. With an additional fine adjustment integrated into the device’s software (setting parameter: distortion, range 80-120 %), the measurement scale could be adjusted individually to the given conditions (powder material, electrostatics, temperature and humidity etc.), significantly improving the measurement accuracy.
However, compared to the usual film thickness variations of 5-10 μm during application, the differences detected are certainly acceptable and the students therefore chose not to use this fine adjustment.
The standard deviations calculated from the repeated measurements at each point are between 1.5 and 1.8 μm. For improved clarity, these values are not included in Figure 2. According to the ANOVA results, the differences between the measured coating thicknesses of the test panels are significant.
Or more precisely: in purely statistical respects, there is a certainty of more than 95 % that the mean coating film thicknesses obtained on the different panels by the ultra-sonic probe are different. The students themselves and the interaction between student and measurement location are not significant. Under these near-ideal conditions, the reproducibility of the ultrasonic instrument can therefore be regarded as very good.

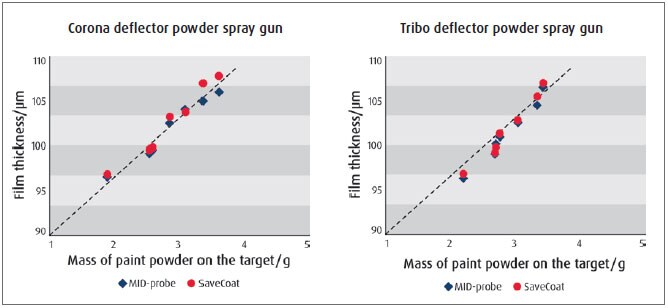
Figure 3: Measured coating thicknesses in relation to the powder mass applied
Student experience in practical application tests
Within the last two years about 100 potential paint engineers have used the ultrasonic probe to measure powder coating thickness directly after application. Their major task was to coat laboratory panels with film thicknesses between 30 and 110 μm, mainly to investigate the coverage of the paint and to identify possible back corona effects at higher film thicknesses.
Further results are available from this work. The experiments were performed with different paint materials for interior and exterior applications. In contrast to the tests described above, the probe was used as handheld instrument. The test panels were fixed to a larger background panel (approx. 0.5 x 0.5 m) with a single hook, leading to some flexibility. Some groups took the panels down after application and placed them on the floor of the spray booth to obtain a more robust positioning for the thickness measurements. In applications with heavier and better fixed work pieces this should not be necessary.
The illustration in Figure 3 shows typical results of two laboratory groups, which were obtained with a RAL 6010 (grass-green) powder for outdoor façades. The measurements shown were carried out with a conventional deflector type powder spray gun with corona charging. Additional measurements performed with a tribo charging gun, especially in the higher film thickness range, confirmed in Fig. 3.
Some observations on accuracy and its limits
The results, based on Figure 3 and some additional onsite observations can be summarised as follows: the quality of the results is directly related to the carefulness of the students during measurement. This is generally true for all process steps in the application and for all measurement methods applied. This apparently trivial point is especially valid in the present situation, working with some very inexperienced students.
The weight of the powder paint applied represents a solid basis for the comparison of different thickness measurement methods. Here, the determination of the weight before curing should be preferred to avoid inaccuracies caused by handling of the coated panels as well as mass loss due to evaporation of degradation products. The results obtained are slightly subjective. Coatings that deviate from the expected thickness might be showing real coating thickness variability on the substrate, or possibly ‘real erroneous’ measurements.
However, it could be observed that the stability and the quality of the results of all student groups improved during the course of the tests due to increasing experience with the application and measuring devices. In the present application the coating thicknesses of both measuring methods in the whole tested thickness range correlate very well. In the example illustrated the maximum deviation is about 10 μm, which seems to be more than acceptable taking into consideration the different measuring positions and coating thickness variability on the substrate.
Greater deviations may result close to the limits of the measurement range as a consequence of the one-sided statistical determination of the mean film thickness. The existing tendency to deliver slightly higher coating thicknesses in comparison to the MID-probe is partly confirmed. As discussed above, an additional fine adjustment of the instrument calibration would have improved the correlation between the two film thickness measurement instruments further [1].
More extensive results again show good correlations
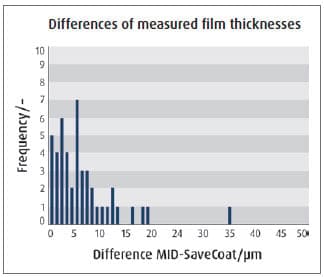
The results from a whole term (winter term 2013/2014) are displayed in Figure 4. This shows the frequency distribution of the modulus of the differences of measured film thickness by MID-probe and ultrasonic probe (polyester paint, pure white, RAL 9016). The results were presented by students at the end of the term and are based on the existing protocols without further corrections.

Figure 4: Frequency distribution of measured film thickness differences (winter term 2013/14)
Of course, the distribution obtained will include some obvious, but also hidden ‘wrong measurements’. Nevertheless, more than 80 % of all the obtained differences are within a range of less than 10 μm, although the fine adjustment was not used.
Presumably, the results contain also some repeated measurements, which were neither recorded nor documented in detail. It should be added that the work takes
place during the sixth term, i.e. almost directly before the start of the bachelor thesis. Therefore a high degree of responsibility can be expected from the students.
Quality of results assessed
Both the detailed analysis of the accuracy and the reproducibility of the measurements as well as practical application demonstrate that the ultrasonic gauge can be used successfully for the determination of uncured coating thicknesses of powder paint films.
While the direct determination of the standard deviation of the measured coating thicknesses under ideal application conditions reveals values of about ± 1.8 μm, the typical differences between the hand-held measurements and the measurements with the MID probe after the curing of the layer are less than 10 μm.
This can be regarded as very good, taking into consideration the limited experience of the users with both the instrument and powder application procedures. It should be mentioned that erroneous measurements cannot be completely avoided.
The main source of errors is probably insufficient echo signal optimisation during the measuring procedure caused by too short a time period at optimal measuring distance and perpendicular orientation of the probe relative to the panel. As a result, there are not enough qualified signal candidates to achieve a stable calculation of the coating thickness.
In addition, the relatively unstable attachment of the test panels was not very helpful. Multiple measurements should always be performed over the substrate to achieve stable mean film thicknesses. The acquisition time of 2 seconds for each measuring point should permit useful measurements in many practical applications.
References
[1] User manual, “SaveCoat 7”, Innotest AG, Eschlikon (Switzerland).
[2] Kleppmann W., Taschenbuch Versuchsplanung, 4. Auflage, Carl
Hanser Verlag München Wien, 2009.
Related Product(s)
Download Full PDF |